EfficientNet PyTorch
Quickstart
Install with pip install efficientnet_pytorch and load a pretrained EfficientNet with:
from efficientnet_pytorch import EfficientNet
model = EfficientNet.from_pretrained('efficientnet-b0')
Updates
Update (April 2, 2021)
The EfficientNetV2 paper has been released! I am working on implementing it as you read this :)
About EfficientNetV2:
EfficientNetV2 is a new family of convolutional networks that have faster training speed and better parameter efficiency than previous models. To develop this family of models, we use a combination of training-aware neural architecture search and scaling, to jointly optimize training speed and parameter efficiency. The models were searched from the search space enriched with new ops such as Fused-MBConv.
Here is a comparison:

Update (Aug 25, 2020)
This update adds:
- A new
include_top(default:True) option (#208) - Continuous testing with sotabench
- Code quality improvements and fixes (#215 #223)
Update (May 14, 2020)
This update adds comprehensive comments and documentation (thanks to @workingcoder).
Update (January 23, 2020)
This update adds a new category of pre-trained model based on adversarial training, called advprop. It is important to note that the preprocessing required for the advprop pretrained models is slightly different from normal ImageNet preprocessing. As a result, by default, advprop models are not used. To load a model with advprop, use:
model = EfficientNet.from_pretrained("efficientnet-b0", advprop=True)There is also a new, large efficientnet-b8 pretrained model that is only available in advprop form. When using these models, replace ImageNet preprocessing code as follows:
if advprop:  # for models using advprop pretrained weights
    normalize = transforms.Lambda(lambda img: img * 2.0 - 1.0)
else:
    normalize = transforms.Normalize(mean=[0.485, 0.456, 0.406],
                                     std=[0.229, 0.224, 0.225])
This update also addresses multiple other issues (#115, #128).
Update (October 15, 2019)
This update allows you to choose whether to use a memory-efficient Swish activation. The memory-efficient version is chosen by default, but it cannot be used when exporting using PyTorch JIT. For this purpose, we have also included a standard (export-friendly) swish activation function. To switch to the export-friendly version, simply call model.set_swish(memory_efficient=False) after loading your desired model. This update addresses issues #88 and #89.
Update (October 12, 2019)
This update makes the Swish activation function more memory-efficient. It also addresses pull requests #72, #73, #85, and #86. Thanks to the authors of all the pull requests!
Update (July 31, 2019)
Upgrade the pip package with pip install --upgrade efficientnet-pytorch
The B6 and B7 models are now available. Additionally, all pretrained models have been updated to use AutoAugment preprocessing, which translates to better performance across the board. Usage is the same as before:
from efficientnet_pytorch import EfficientNet
model = EfficientNet.from_pretrained('efficientnet-b7')
Update (June 29, 2019)
This update adds easy model exporting (#20) and feature extraction (#38).
- Example: Export to ONNX
- Example: Extract features
- Also: fixed a CUDA/CPU bug (#32)
It is also now incredibly simple to load a pretrained model with a new number of classes for transfer learning:
model = EfficientNet.from_pretrained('efficientnet-b1', num_classes=23)Update (June 23, 2019)
The B4 and B5 models are now available. Their usage is identical to the other models:
from efficientnet_pytorch import EfficientNet
model = EfficientNet.from_pretrained('efficientnet-b4')
Overview
This repository contains an op-for-op PyTorch reimplementation of EfficientNet, along with pre-trained models and examples.
The goal of this implementation is to be simple, highly extensible, and easy to integrate into your own projects. This implementation is a work in progress -- new features are currently being implemented.
At the moment, you can easily:
- Load pretrained EfficientNet models
- Use EfficientNet models for classification or feature extraction
- Evaluate EfficientNet models on ImageNet or your own images
Upcoming features: In the next few days, you will be able to:
- Train new models from scratch on ImageNet with a simple command
- Quickly finetune an EfficientNet on your own dataset
- Export EfficientNet models for production
Table of contents
About EfficientNet
If you're new to EfficientNets, here is an explanation straight from the official TensorFlow implementation:
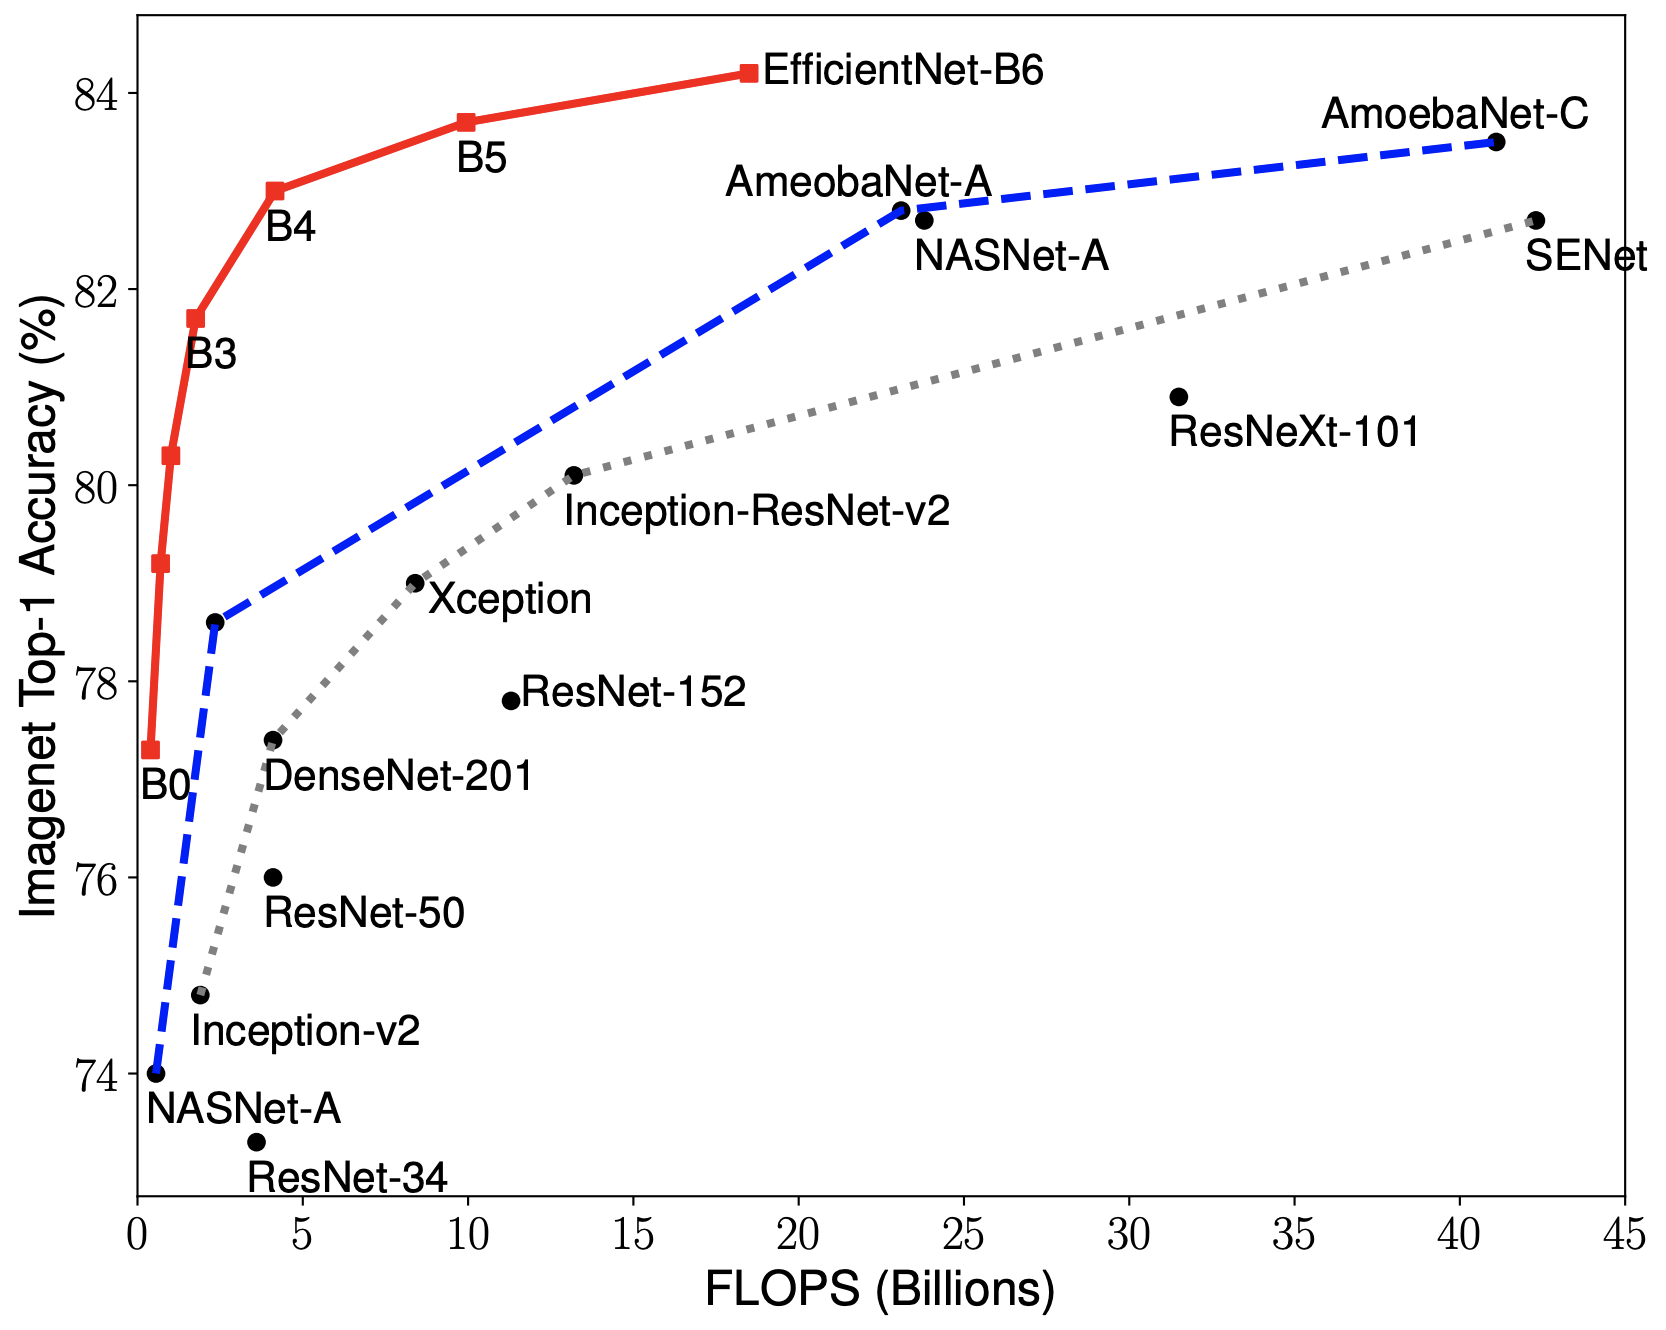
EfficientNets are a family of image classification models, which achieve state-of-the-art accuracy, yet being an order-of-magnitude smaller and faster than previous models. We develop EfficientNets based on AutoML and Compound Scaling. In particular, we first use AutoML Mobile framework to develop a mobile-size baseline network, named as EfficientNet-B0; Then, we use the compound scaling method to scale up this baseline to obtain EfficientNet-B1 to B7.

|
|
EfficientNets achieve state-of-the-art accuracy on ImageNet with an order of magnitude better efficiency:
-
In high-accuracy regime, our EfficientNet-B7 achieves state-of-the-art 84.4% top-1 / 97.1% top-5 accuracy on ImageNet with 66M parameters and 37B FLOPS, being 8.4x smaller and 6.1x faster on CPU inference than previous best Gpipe.
-
In middle-accuracy regime, our EfficientNet-B1 is 7.6x smaller and 5.7x faster on CPU inference than ResNet-152, with similar ImageNet accuracy.
-
Compared with the widely used ResNet-50, our EfficientNet-B4 improves the top-1 accuracy from 76.3% of ResNet-50 to 82.6% (+6.3%), under similar FLOPS constraint.
About EfficientNet PyTorch
EfficientNet PyTorch is a PyTorch re-implementation of EfficientNet. It is consistent with the original TensorFlow implementation, such that it is easy to load weights from a TensorFlow checkpoint. At the same time, we aim to make our PyTorch implementation as simple, flexible, and extensible as possible.
If you have any feature requests or questions, feel free to leave them as GitHub issues!
Installation
Install via pip:
pip install efficientnet_pytorchOr install from source:
git clone https://github.com/lukemelas/EfficientNet-PyTorch
cd EfficientNet-Pytorch
pip install -e .
Usage
Loading pretrained models
Load an EfficientNet:
from efficientnet_pytorch import EfficientNet
model = EfficientNet.from_name('efficientnet-b0')
Load a pretrained EfficientNet:
from efficientnet_pytorch import EfficientNet
model = EfficientNet.from_pretrained('efficientnet-b0')
Details about the models are below:
| Name | # Params | Top-1 Acc. | Pretrained? |
|---|---|---|---|
efficientnet-b0 |
5.3M | 76.3 | ✓ |
efficientnet-b1 |
7.8M | 78.8 | ✓ |
efficientnet-b2 |
9.2M | 79.8 | ✓ |
efficientnet-b3 |
12M | 81.1 | ✓ |
efficientnet-b4 |
19M | 82.6 | ✓ |
efficientnet-b5 |
30M | 83.3 | ✓ |
efficientnet-b6 |
43M | 84.0 | ✓ |
efficientnet-b7 |
66M | 84.4 | ✓ |
Example: Classification
Below is a simple, complete example. It may also be found as a jupyter notebook in examples/simple or as a Colab Notebook.
We assume that in your current directory, there is a img.jpg file and a labels_map.txt file (ImageNet class names). These are both included in examples/simple.
import json
from PIL import Image
import torch
from torchvision import transforms

from efficientnet_pytorch import EfficientNet
model = EfficientNet.from_pretrained('efficientnet-b0')

# Preprocess image
tfms = transforms.Compose([transforms.Resize(224), transforms.ToTensor(),
    transforms.Normalize([0.485, 0.456, 0.406], [0.229, 0.224, 0.225]),])
img = tfms(Image.open('img.jpg')).unsqueeze(0)
print(img.shape) # torch.Size([1, 3, 224, 224])

# Load ImageNet class names
labels_map = json.load(open('labels_map.txt'))
labels_map = [labels_map[str(i)] for i in range(1000)]

# Classify
model.eval()
with torch.no_grad():
    outputs = model(img)

# Print predictions
print('-----')
for idx in torch.topk(outputs, k=5).indices.squeeze(0).tolist():
    prob = torch.softmax(outputs, dim=1)[0, idx].item()
    print('{label:<75} ({p:.2f}%)'.format(label=labels_map[idx], p=prob*100))
Example: Feature Extraction
You can easily extract features with model.extract_features:
from efficientnet_pytorch import EfficientNet
model = EfficientNet.from_pretrained('efficientnet-b0')

# ... image preprocessing as in the classification example ...
print(img.shape) # torch.Size([1, 3, 224, 224])

features = model.extract_features(img)
print(features.shape) # torch.Size([1, 1280, 7, 7])
Example: Export to ONNX
Exporting to ONNX for deploying to production is now simple:
import torch
from efficientnet_pytorch import EfficientNet

model = EfficientNet.from_pretrained('efficientnet-b1')
dummy_input = torch.randn(10, 3, 240, 240)

model.set_swish(memory_efficient=False)
torch.onnx.export(model, dummy_input, "test-b1.onnx", verbose=True)
Here is a Colab example.
ImageNet
See examples/imagenet for details about evaluating on ImageNet.
Contributing
If you find a bug, create a GitHub issue, or even better, submit a pull request. Similarly, if you have questions, simply post them as GitHub issues.
I look forward to seeing what the community does with these models!